Reclaimed slate provides long-term durability while preserving the original character of a roof. These materials have already proven their performance over decades, making them a reliable choice when properly selected and installed. The key is combining quality slate with correct preparation and installation methods so the roof performs consistently over time.
This article outlines how to select reclaimed slate, prepare the roof structure, and handle sorting, layout, and fastening. It also covers key details such as underlayment, flashing, and finishing so installations remain efficient and watertight.
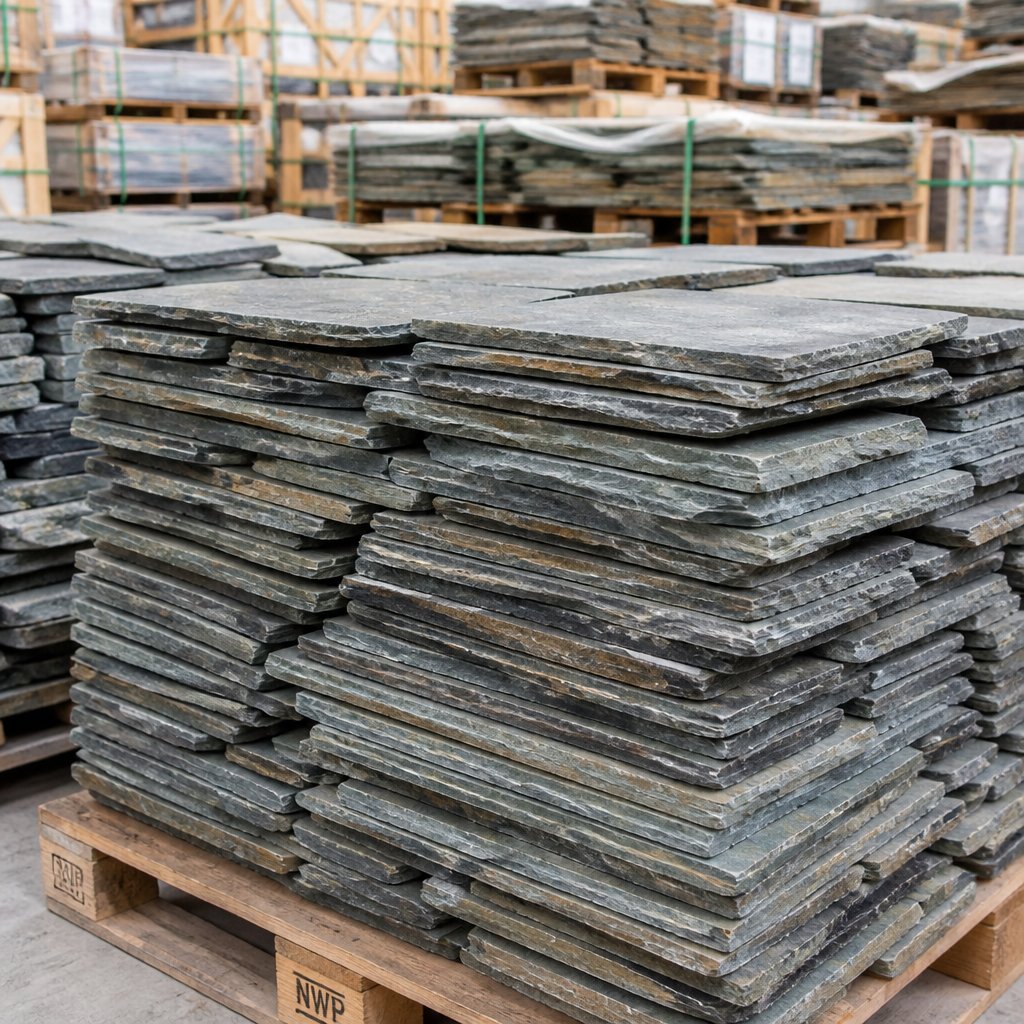
Reclaimed Slate Roofing supplies reclaimed slate that is inspected, cleaned, and sorted for reuse. Materials are prepared for consistent installation and shipped directly to jobsites, helping contractors work with reliable slate that meets both performance and historic requirements.
What’s Good About Reclaimed Slate Roofing?
Reclaimed slate saves materials, lowers long-term costs, and gives your roof a look you just can't get from new, mass-produced tiles. Here’s how reclaimed slate helps the planet, your wallet, and your design goals.
The Environment
Reusing slate cuts landfill waste and avoids the carbon cost of quarrying and manufacturing new tiles. Every reclaimed tile you install keeps a heavy, durable product in service instead of tossing it.
Slate lasts for decades, so you don't need to replace it as often, which means less material and fewer trucks hauling stuff around. That longevity means fewer roof tear-offs and less demand for new raw materials over time.
Choosing reclaimed also preserves historic materials and skips the energy-heavy production cycle. If you care about your environmental footprint, reclaimed slate is a direct, measurable choice.
The Cost Savings
Reclaimed slate can lower material costs compared to buying new premium slate. Often, you pay less per square foot and get ready-to-install pieces that barely need any work.
Labor costs stay about the same as new-slate jobs, but reclaimed slate’s durability means fewer repairs down the line. Fewer callbacks and longer lifespans mean better life-cycle value for both owners and contractors.
If you can source reclaimed locally or from a reliable supplier, you'll cut shipping time and expense. Reclaimed Slate Roofing inspects and sorts materials for fast delivery, which helps you keep projects on schedule.
The Beauty
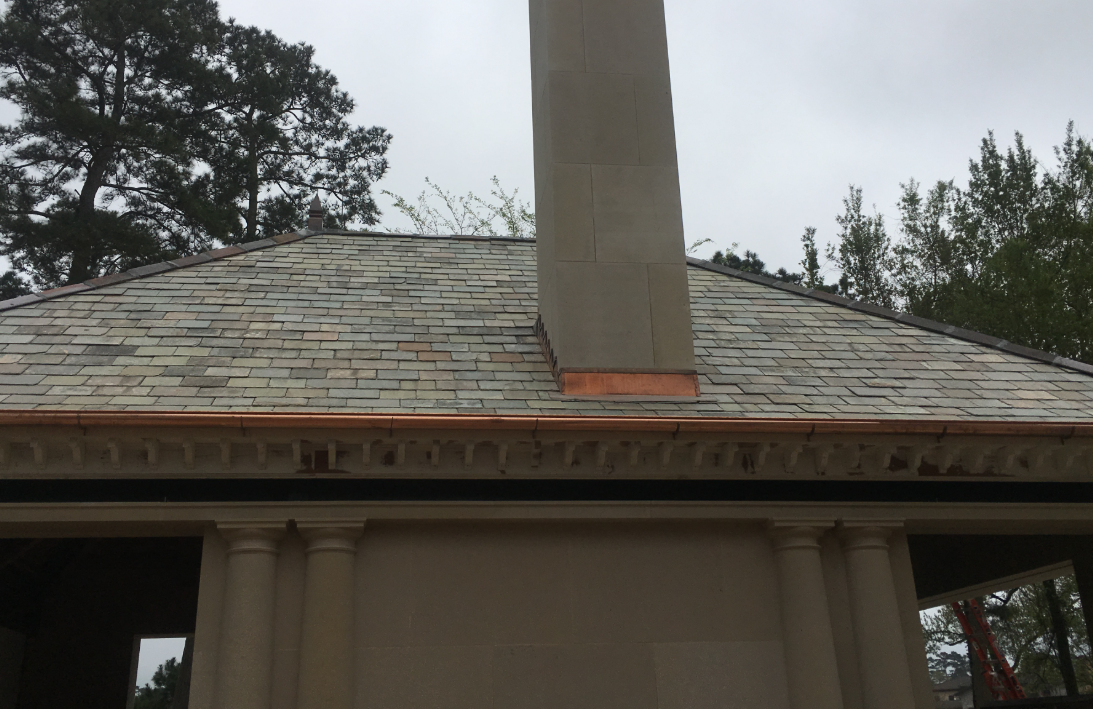
Reclaimed slate carries color variation, weathering, and textures that new products just can’t fake. Those natural patinas match historic buildings and bring character to new projects.
You can mix sizes and grades for a graduated pattern, or match an existing roof with surprising accuracy. Contractors and architects love reclaimed slate for its authenticity and the way it pairs with traditional millwork and rooflines.
Each piece has a history, so your roof gets this visual depth that really boosts curb appeal and helps preserve architectural integrity. If you want a roof that reads as original and carefully crafted, go reclaimed.
Selecting Quality Reclaimed Slate
You need slate that matches your roof’s weather, pitch, and appearance, but also meets performance and code needs. Focus on slate type, physical condition, and verified sourcing to avoid headaches and extra costs.
Choosing the Right Slate Type
Pick your slate by color, grain, and durability. Harder slates like Pennsylvania black or Vermont green shrug off frost and breakage better than softer stuff. Ask for the geological name or where it came from so you can match longevity and the look you want.
Match slate thickness to roof pitch: thinner slates go on steep roofs, thicker ones on low slopes. Check size and gauge—consistent sizes make laying faster and waste less. For historic projects, pick slates with similar surface texture and weathering so patches blend in.
Specify fastener type and nail length based on slate grade. Use stainless steel or copper nails for reclaimed material to avoid corrosion and staining.
Inspecting Slate Condition
Look over every batch before you buy—and again when it arrives. Watch for cracks, delamination, and heavy mineral staining that weaken tiles. Minor surface wear? Fine. Structural splits or salt deposits? No thanks.
Sort slates into quality grades on site: A-grade for visible fields, B-grade for valleys or hidden spots, and rejects for disposal. Count extra pieces for waste and off-cuts—plan for 10–20% overrun for repairs and tricky layouts.
Test a sample slate by tapping and flexing gently; a clear ringing sound and tight grain mean good integrity. Keep inspection photos and serial numbers if you get them from the supplier.
Sourcing Authentic Reclaimed Materials
Reliable sourcing is critical for reclaimed slate installation. You need verified material, consistent grading, and delivery you can plan around. Clear documentation and proper preparation reduce risk and keep projects on schedule.
Verified Origin and Prepared Batches
Reclaimed Slate Roofing sources reclaimed slate directly from architectural demolition and historic structures. Each batch is selected for consistency in size, thickness, and color, then inspected, cleaned, and sorted before shipment. Materials arrive ready for installation, reducing the need for additional handling on site.
Batch identification allows contractors to maintain uniformity across the roof and simplifies future repairs by ensuring matching material is available.
Inspection and Quality Control
Every piece is vetted for structural integrity and surface condition. Defective or inconsistent slate is removed during sorting, so installers are working with reliable material from the start.
Prepared batches reduce time spent sorting and checking pieces on site. This improves installation efficiency and helps maintain consistent coursing and alignment.
Efficient Ordering and Delivery
Materials are palletized and packaged to prevent damage during transit. Orders are shipped with defined timelines and delivered directly to jobsites, allowing crews to move into installation without delays.
Builder-direct pricing and consistent supply make it easier to plan projects without unexpected material variation or scheduling issues.
Pre-Installation Planning
Get your roof checked, design picked, and material list sorted before the crew shows up. Inspect structure, pick a slate layout and flashing details, and stage reclaimed pieces and tools for fast work.
Roof Structure Assessment
Walk the roof and attic to check rafters, decking, and load capacity. Look for rot, insect damage, and sagging. Measure rafter spacing and deck thickness; reclaimed slate is heavy and usually needs 300–500 lb per square foot load planning for full dead and live load.
Inspect the underlayment and flashings. Strip any failing felt or asphalt first. Note valley, hip, and chimney conditions where custom slate cuts and metal flashing will be needed.
Record dimensions and snap photos. Mark areas that need structural repair or new sheathing. Share these details with your crew and supplier to confirm slate grade and shipment size.
Design Considerations
Decide on a slate pattern: fully graduated, uniform courses, or staggered sizes. Fully graduated roofs mix sizes for a historic look; plan the size mix before ordering so you don’t end up with a patchwork.
Choose headlap and exposure based on local climate and slope. Steeper slopes use larger exposures; low slopes need more headlap and tighter joints. Pick flashing metals (copper, lead-coated copper, or stainless) and fastener type—copper or stainless nails last longest.
Order an extra 10–15% reclaimed slate for repairs and waste, more for complex hips, valleys, or custom shapes. Confirm color and weathering batches if visual match matters.
Preparing Materials and Tools
Stage reclaimed slates by grade and size on pallets near the roof access. Inspect each tile for cracks, pinholes, and thickness. Keep broken or thin pieces aside for small repairs only.
Gather tools: slate hammer, ripper, slate cutter or saw, nail set, chalk lines, ladders, roof brackets, scaffold, and personal fall protection. Stock up on copper or stainless slating nails in the right lengths for your decking.
Prep flashings, underlayment, battens (if needed), and drip edge. Label crates and make a cut list to speed up installation. Check delivery timing with Reclaimed Slate Roofing so material arrives before you finish structural repairs.
Surface Preparation And Underlayment
Get the deck clean, dry, and structurally sound. Choose a waterproof underlayment that works with reclaimed slate and install it with proper overlaps and fasteners to protect both the slate and the roof structure.
Cleaning and Repairing the Roof Deck
Check the deck for rot, delamination, or loose boards. Replace any damaged sheathing with 3/4" plywood or OSB rated for roofing to match existing thickness and support slate weight.
Strip off old roofing, nails, tar, and debris down to bare deck. Sweep and blow off the surface so the underlayment sits flat and seals well. Fix any high or low spots that could stress slates.
Flash and repair roof penetrations—chimneys, vents, valleys—before underlayment goes down. Install new drip edge at eaves and rakes to protect sheathing and direct water away from fascia.
Use a moisture meter to check deck dryness. If the attic stays damp, fix ventilation and insulation first. A dry, even deck keeps nails from pulling through and slates from breaking.
Installing Waterproof Underlayment
Pick a high-temp, self-adhering underlayment in valleys and rakes; use a breathable synthetic underlayment across the field. Skip asphalt-saturated felt under reclaimed slate on steep, long-life roofs.
Lay underlayment parallel to the eave with at least a 4" end lap and 2" side lap for self-adhering products; follow manufacturer specs for synthetics. Stagger end laps over framing members to cut down on seep paths.
Fasten synthetic underlayment with corrosion-resistant ring-shank or capped nails, spaced per instructions. Keep fasteners out of slate exposure lines to avoid future leaks and staining.
Seal transitions with compatible flashing and roofing-grade sealant. In valleys and around chimneys, put down two layers: a self-adhering liner plus a top-layer synthetic. This limits water entry where reclaimed slate may be interrupted.
Slate Sorting And Layout
Plan slate by size, thickness, and color before you lift a single tile. Sorting ahead saves time on the roof, prevents waste, and helps you match patterns and weatherproofing needs.
Arranging Slate by Size and Thickness
Start by separating slates into piles by length and thickness. Label stacks with tape or chalk—12"x6", 14"x8", heavy, medium, thin—so installers can grab the right piece fast.
Put the thickest, widest slates at the eaves and the thinnest, narrowest ones towards the ridge. That keeps a graduated weight profile and reduces stress on battens and nails. Keep replacement stock for hips, rakes, and valley cuts close to the work area.
Check each slate for cracks and nicks as you sort. Reject any delaminated pieces and mark marginal ones for non-critical spots.
Ensuring Color Consistency
Group slates by visible tone and surface weathering. Make small test bundles of neighboring courses to see how colors look from the ground.
If you’re using reclaimed pieces from different batches, mix them across the roof instead of keeping batches isolated. This avoids weird stripes or patchy zones. For accent courses or pattern work, set aside consistent shades and mark them.
Document batch numbers and placement plans. A quick layout map taped near the staging area speeds up decisions and keeps color transitions intentional.
Dry Laying for Pattern Planning
Dry lay full-width rows on the ground or an unused roof section to set your bond and spot mismatches. Use the same exposure and headlap you plan to install so measurements stay true.
Check coursing, reveal lines, and nail locations during the dry run. Jot down any shims, cuts, or special pieces needed for chimneys, valleys, and dormers. Snap a photo of the dry layout for quick reference on the roof.
Adjust slate selection after dry laying. Swap pieces to balance weight and color, and mark final placement with chalk or numbered tags before you install. Reclaimed Slate Roofing can supply pre-sorted lots if you need consistent runs or rare sizes.
Slate Installation Methods
Let’s talk about the main ways to fix reclaimed slate so your roof stays watertight and lasts for decades. Focus on secure fastenings, good laps, and careful cutting to match historic patterns and loads.
Nailing Techniques
Use copper or stainless-steel nails sized for the slate thickness and exposure. Drive nails through the head, about 1 inch above the butt and centered in the slate, so the nail sits on the roof deck without bending. For double-nail rows, space nails about 1.5–2 inches apart horizontally to prevent splitting.
Always pre-drill fragile reclaimed pieces if grain or weathering makes splitting likely. Countersink heads just enough so they sit flush or under the slate surface. Use only corrosion-resistant nails; plain steel will stain and fail. Check each slate after fastening and swap out any cracked ones.
Hook Fixing Method
Hooks really shine on thin or weathered reclaimed slates that just can’t take nails. You slip a copper or stainless hook over the butt, tuck it under the slate above, then fasten the hook to the batten or deck with a screw or nail. Try to position hooks so they grip the slate at its belly—that’s what keeps them from blowing off in a storm.
If you’ve got extra-wide slates or tricky valley pieces, use two hooks for better balance. Make sure hooks don’t lift up the neighboring slates or leave weird gaps. For historic roofs, it’s worth matching the original hook placement to keep the roof’s character.
Headlap and Side Lap Best Practices
Headlap matters—a lot. Stick to 3 inches on low slopes (3:12), and bump it up to 4–5 inches on steeper pitches unless your local code says otherwise. Measure and mark battens carefully so you keep headlap even across the whole roof. A gauge or chalk line makes it easier to repeat.
Side lap comes down to slate width and how much of the edge is exposed. Where edges are open to the wind, add 1–2 inches of side lap and use lead or metal flashing if you get a lot of wind-driven rain. Always stagger joints between courses so vertical seams never line up for three or more rows.
Working With Cut and Shaped Slate Tiles
Cut slates with a slate cutter, scoring tool, or an angle grinder with a diamond blade. On wider shapes, make relief cuts to avoid cracking. When you’re shaping slates around chimneys, valleys, or hips, dry-fit each piece first to check the fit and keep courses lined up.
Trim butts cleanly and drive copper or stainless nails at least an inch from any cut edge. For ridges and hips, shape slates right and use metal saddle flashings where needed. Keep your off-cuts sorted by size and shape—you’ll thank yourself later for repairs or tricky fits. Reclaimed Slate Roofing can send you pre-graded slates to save sorting time.
Detailing Hips, Ridges, And Valleys
Getting weatherproof joints at hips, ridges, and valleys is key. Use careful cutting, good underlayment, and solid flashing so slates sit flat, shed water, and stand up to wind.
Installing Ridge Caps
Start ridge caps at the high point and work down toward each eave. Use 18–24 inch-long slate or copper ridge pieces. Pre-drill holes and drive long copper or stainless nails into the ridge board—not just the slate. Space caps so they overlap at least 3 inches and fully cover the vent or mortar bed.
If you’re using a vented ridge, trim the caps so they clear the vent slot. Only use a small bead of compatible sealant at the joints, and skip the heavy mortar—it just cracks later. Check alignment as you go so hips and ridges run straight.
Hip Detailing Steps
Lay hip slates at a 45° angle from the eaves up to the ridge. Use full slates when you can, and cut a clean bevel along the exposed edge so water runs off the hip. Fasten each hip slate with two nails: one into the hip rafter and one into the field slate or batten.
Install a metal hip starter or underlay strip along the hip to protect the sheathing before you set slates. When slates meet valleys or ridges, trim for a 1/4–1/2 inch reveal to prevent binding. If you spot a cracked slate while nailing, swap it out right away.
Valley Flashing Techniques
Pick open or closed valley flashing based on your roof’s slope and slate size. For open valleys, use continuous coil copper or 24–26 gauge steel, letting it run 8–12 inches onto each roof plane. Center the flashing and tuck its edges under the underlayment.
For closed (woven) valleys, alternate slates from each side tightly, and cap with a thin metal saddle at the ridge if needed. Lap valley slates over the flashing by at least 4 inches, and cut a neat line where water flows. In cold climates, lay a strip of high-temp ice-and-water shield in the valley base to help stop ice dam leaks.
Finishing Touches And Cleanup
These steps make the roof watertight, tidy, and ready to hand off. Focus on sharp trimming, good sealing, and a thorough cleanup to protect both the slate and the property.
Trimming and Sizing Slate Edges
Measure each edge where slates meet hips, ridges, gables, and eaves. Mark your cut lines with a pencil and a square. For straight cuts, use a slate cutter or angle grinder with a diamond blade. For diagonals or shapes, score and snap, then smooth the edge with a rasp.
Keep cut pieces at least two inches wide for strength. At vulnerable spots, double up on nails or use copper plate reinforcement. Fit slates to keep exposed edges lined up horizontally. Check for hairline fractures and toss any pieces that look like they’ll split under wind or freeze-thaw.
Label leftover matching slates for repairs. Store them off the roof on pallets or racks so they don’t break.
Sealing and Finishing
Use lead, copper, or synthetic flashing at valleys, chimneys, and dormers. Solder or fasten flashing tight to keep out water and wind. On exposed cuts, apply a breathable, UV-stable sealant made for stone—blocks water, but doesn’t trap it.
Dress hips and ridges with pre-cut ridge slates or a matching ridge system. Nail ridge pieces through a batten or underlayment to stand up to wind. If you need mortar, stick with lime-based mixes for reclaimed slate; they let the roof breathe.
Check all nails and fasteners. Swap out any corroded ones for stainless or copper nails sized for your slate. Test water flow with a hose to make sure flashing and seals work before you wrap up.
Job Site Cleanup
Pick up all broken slate, nails, and metal scraps as you go. Sweep the roof and gutters by hand—no power brooms, or you’ll knock slates loose. Use a magnetic sweeper around the building and driveway to catch stray nails and metal.
Bag and label good offcuts for patching. Recycle unusable slate and metal if your area allows—lots of slates and copper can be reused. Leave things safe: cover open roof areas, stack materials neatly, and put up a warning if work isn’t finished.
If you got materials from Reclaimed Slate Roofing, put unused pieces back in inventory for future matching and note any oddities for the owner’s maintenance file.
Maintenance And Longevity Tips
With a little care, reclaimed slate roofs stay watertight and last for decades. Inspect, repair, and keep growth in check—otherwise, you’ll face bigger headaches down the road.
Routine Inspections
Walk the roof line or grab binoculars every spring and after storms. Watch for slipped or missing slates, broken corners, loose flashing, and rusty nails. If you spot dark streaks or damp spots in the attic, those are red flags for leaks.
Pay close attention to valleys, chimneys, and penetrations. Flashing should fit tight with no gaps. Snap photos and jot down dates for any problems—helps you track repeat issues.
Every 3–5 years, hire a roofer for a hands-on check and to look at nails and underlayment. Get someone who knows reclaimed slate so they don’t do more harm than good.
Repairing Damaged Slate
Swap out broken or cracked slates right away to keep water out. Use a slate ripper or pliers to pull nails—don’t pry up the slates next to it. Slide in a matching reclaimed slate and fasten it with stainless or copper nails.
For slipped slates, gently lift the row above, slide the new one in, and clinch the nail with a hook. If flashing’s damaged, replace it and re-seal with lead or new flashing.
Keep a few matching reclaimed pieces on hand for quick fixes. For bigger patches, bring in a roofer who gets coursing and color matching on old slate.
Preventing Moss and Algae Growth
Clear moss and algae so they don’t trap moisture or lift slates. Use a soft brush or low-pressure rinse—never a pressure washer, unless you want broken slates and lost bedding. If there’s heavy growth, go for a biodegradable moss-killer labeled for slate.
Trim back branches to let in sun and air. Install zinc or copper strips near the ridge—rain will wash trace metals down and slow moss growth.
Check gutters and valleys every month. Clogged channels hold water and encourage moss. Clean out debris and keep downspouts open for good drainage.
Frequently Asked Questions
Here’s the nitty-gritty on laying, installing, repairing, and fastening reclaimed slate. You’ll find answers to common jobsite headaches and underlayment questions so you can plan your materials and labor.
How do you properly lay slate roof tiles?
Start at the lowest eave and work up toward the ridge. Snap a chalk line to keep rows straight and keep headlap consistent—usually 3 inches for most slates.
Put bigger, thicker slates at the eave and smaller ones near the ridge if you’re doing a graduated layout. Overlap each slate so water runs off and doesn’t hit the nail holes.
Stagger joints so no two vertical seams line up in back-to-back courses. Cut slates with a cutter or scoring tool to fit hips, valleys, and edges.
What are the detailed steps in slate roof installation?
First, inspect and fix the roof deck. Lay down a good underlayment and metal flashings at chimneys, valleys, and penetrations.
Start with starter courses along the eave, then snap chalk lines for each row. Nail each slate with two corrosion-resistant copper or stainless nails through the predrilled hole or near the top edge.
Cut and fit slates around details, install valley and ridge metalwork, and finish with ridge slates or caps. Check each row for even exposure and headlap as you go.
Can you repair a slate roof from inside, and if so, how?
You can check from inside for leaks—look for stains, wet framing, or drips. That helps you spot problems, but you still need to check outside.
For small repairs, lift the overlapping slate above the damaged one, pull the broken piece, and slide in a new or reclaimed slate. Fasten with copper or stainless nails and seal only around flashings if needed.
What are the main challenges when working with reclaimed slate roofs?
Mixed sizes and ages mean you’ll spend time sorting and grading slates on site to match thickness and color. Uneven thickness can mess with headlap and might need shimming or special placement.
Brittle or weathered slates break easily during cutting or nailing, so handle them gently and use the right tools. Odd shapes at hips, ridges, and flashings take extra time to fit.
Is a membrane required under slate roofing, and what are its benefits?
A membrane isn’t strictly required for historic work, but these days most people use a breathable underlayment or waterproof membrane. It gives you backup protection during heavy rain and acts as a second barrier if a slate fails.
Underlayment also shields the deck during installation and cuts leak risks at valleys and penetrations. Pick a product that works with natural slate and meets local codes.
What fasteners are recommended for securing slate tiles on a roof?
Go with copper or stainless steel nails—they should be long enough to sink at least 3/4 inch into the deck after passing through the slate. Copper’s the classic pick and lasts ages, but stainless steel is a solid choice, especially if you’re near the coast or dealing with treated wood.
Skip common steel nails or staples; they’ll rust and might even crack the slate. If you’re working on repairs, you might need lead washers or special hooks, but only if local codes and your materials say it’s okay.