Matching historic slate tiles requires precision, not guesswork. The goal is a consistent blend in color, texture, and origin so repairs do not stand out over time. Start with small samples in natural light. Look for true quarried tones, weathered edges, and the natural variation that comes with aged slate. Use reclaimed materials that have been inspected and cleaned so you know exactly what is going on the roof.
This guide covers practical steps you can use on site to identify slate age, match surface texture, and select replacements that integrate with existing courses. It also outlines simple tools and tests that speed up the process, along with key installation details such as mortar and fastening methods that affect the final result.
Material quality and consistency matter as much as technique. Reclaimed Slate Roofing supplies authentic reclaimed slate that has been vetted, sorted, and prepared for reuse. This reduces uncertainty on site and helps keep projects on schedule. With builder-direct pricing and fast delivery, it is a practical option for contractors and architects who need reliable access to historic roofing materials.
Historic Slate Tile Varieties
Historic slate comes in a surprising range of colors, sizes, and cuts. Spotting the right type and knowing what features to look for really helps when you’re matching repairs or specifying materials for a restoration.
Common Types of Historic Slate
- Hard slate (Pennsylvania and Vermont): It’s dense, dark gray to black, and shrugs off weather for decades. You’ll usually see it as thin, rectangular shingles, 12"–18" long.
- Soft slate (Welsh, some Appalachian sources): Softer, often purple, green, or mottled. These split more easily, so you have to handle them gently and use tighter nailing.
- Reclaimed patterned and shaped tiles: Think fish-scale, scalloped, or hexagonal cuts—Victorian roofs loved these. They add decorative bands and mix colors for visual punch.
- Thickness and bedding: Check thickness at the butt; old pieces range from 3/16" to over 1/2". Thinner slate is lighter (but also more fragile). Pay attention to the bedding (the way the slate naturally splits) to match how water runs off.
Notable Characteristics to Identify
Color and grain give away a lot. Hunt for consistent color bands, surface sheen, and those little mineral flecks when you’re matching.
Nail holes and slatemaker marks are worth checking. Old nail holes usually sit 1"–2" from the top; matching those helps avoid splits when you reinstall.
Test a sample for delamination and freeze-thaw resistance. Give pieces a tap and a gentle bend—if the edges crumble or layers peel, skip it for long-term use.
Size, shape, and cut all matter. Match the original exposure (how much slate shows) and butt width to keep the roof’s look and water flow right.
Regional Differences in Slate Tiles
Slate color and quality really depend on where it’s quarried. Pennsylvania slate is usually dark gray to black and tough as nails. Welsh or northern British slate? Deep purples and greens, often with a kind of satin sheen.
New England quarries turn out grays and blues with tight grain and great freeze-thaw resistance. Appalachian areas offer softer, colorful slates you’ll see on regional historic homes.
If you need an exact match, try to find reclaimed supply from the same region. Reclaimed Slate Roofing keeps batches sorted and labeled, making it less of a headache when you’re restoring.
Essential Tools and Materials for Slate Tile Matching
You’ll want solid measurement tools, smart sampling habits, and proper safety gear to match historic slate. The right stuff saves time and helps you keep those old materials in one piece.
Inspection and Measurement Equipment
Bring a digital caliper, metal tape, and a small rigid square. Use the caliper for slate thickness down to 0.1 mm. Measure length and width with the tape, and check for squareness.
A good color card or Munsell book helps you pin down hue and value under natural light. Snap photos of each sample with a scale bar and a neutral gray card for color reference. A pocket loupe (10–20x) is handy for spotting lamination, bending, or mineral veins.
Keep your gear in shape—clean caliper jaws, make sure the tape retracts, and keep batteries charged. Label measurements and photos right away so you don’t mix things up.
Sample Collection Methods
Pull intact, representative tiles from low-risk spots like ridges, valleys, or spots where flashing came off. Don’t pry up solid areas; start with slipped or damaged tiles.
Grab at least three tiles from different roof zones to capture color and weathering variation. Pack each tile with cardboard separators and mark where it came from. Record slate thickness, corner shape, nail hole style, and any maker’s marks.
If you can’t remove a whole tile, cut a small chunk from a loose corner and tape the cut. Send physical samples to your supplier—Reclaimed Slate Roofing will inspect and help match if you include clear photos and notes.
Safety Gear for Handling Historic Slate
Wear cut-resistant gloves and safety glasses (those edges can be brutal). Use a dust mask or respirator rated for mineral dust when cutting or sanding.
If you’re up on a sloped roof, use knee pads and a harness. Soft-sided carriers or plywood sheets help move tiles without chips. Keep a first-aid kit handy, plus a waste bin for broken bits and dust.
Check for lead flashings or old sealants and use gloves that can handle chemicals. Change out PPE if it’s worn—protecting yourself also protects the slate you want to reuse.
Identifying Slate Tile Age and Origin
You’ll want to read maker marks, spot signs of age, and figure out past repairs. These skills let you match slates by color, size, texture, and where they came from.
Deciphering Manufacturer Marks
Look for stamps or marks on the back or tail of the slate. They might show a town name, quarry, or initials. Take photos of each and compare with regional quarry lists or old catalogs.
Notice the shape and spot where the mark sits. Circular or rectangular stamps were big in the 19th and early 20th centuries. Hand-chiseled marks? Likely older, small-batch stuff. Machine-pressed marks usually mean later, industrial production.
If marks are worn, measure slate dimensions and thickness, then combine with color and cleavage pattern to guess the origin. Keep records—what the mark says, measurements, and where you found the piece.
Aging Techniques for Slate
Check surface weathering. Old slate shows patina, a thin sheen, or iron-stain lines from old roof fixings. Newer slate usually has sharper edges and brighter color.
If you need to, snap a small sample. Fresh breaks show true color and grain, which helps date the tile. Try to avoid removing a lot from historic roofs—work with a roofer who knows reclamation.
Measure fastener holes and nail types. Square-cut holes or two-nail patterns mean older methods. Modern ring-shank or stainless nails? That’s more recent work.
Evaluating Previous Restoration Efforts
Peek under a lifted slate to check underlayment and battens. Modern felt or synthetic underlayment means recent work. Original wood lath or no underlayment at all? That’s probably untouched.
Look for mixed batches of slate color, size, or thickness. Patchwork with obvious mismatches shows earlier (maybe not-so-great) repairs. Check flashing materials: lead or terne is period-correct, copper or modern membrane is newer.
Document what you see. That helps you order matching reclaimed slates and use the right installation methods. If you need reclaimed material for a spot-on match, Reclaimed Slate Roofing can source and ship what you need.
Color and Texture Matching Techniques
To get color, tone, and surface texture right, use direct samples, good lighting, and written notes. Test a few tiles in place before you go all in, and expect that weathering will keep changing things over time.
Visual Comparison Best Practices
Bring physical samples to the site—photos just don’t catch those subtle hues. Compare samples on the roof at midday, under natural light. Use a neutral gray card to kill color cast from the sky.
Lay possible matches on a white background and next to old tiles. Check from street level, gutter line, and different roof planes. Notice hue, mottling, and edge color. Record the tile code, quarry or batch, and snap a clear photo for each attempt.
If you’re stuck with photos, put a color reference chip in the shot and skip the flash. For the final call, install a small patch of 6–12 tiles and look again after a couple days.
Patina and Weathering Considerations
Patina changes color more than the original dye or minerals. Older slate might have lime stains, iron streaks, or surface oxidation that shifts the tone. Match both the base color and how weathered it looks.
Bring reclaimed pieces with similar age and exposure. If you’re blending in new material, try pre-aging a few tiles—maybe a light sanding or some exposure tests—then compare to the originals. Shadows and roof angle change what you see, so check matches in wet and dry weather.
Plan to blend new tiles in slowly. Replace in phases so new tiles can weather into the old patina. Reclaimed Slate Roofing can supply reclaimed pieces that already look the part for historic projects.
Surface Texture Replication
Figure out the surface type: cleft, hand-split, sawn, or honed. Texture changes how light hits and how dirt or lichen build up. Match the edge and face finish to keep the roof’s character.
Measure throat depth, thickness, and split edge detail. If you can’t get exact reclaimed tiles, pick the closest texture and tweak your installation—maybe stagger courses or adjust exposure—to keep things looking right. For really textured surfaces, avoid super-smooth replacements; they’ll stick out.
Take close-up photos and short video clips of the texture. Send these to your supplier to cut down on returns and make sure what you get fits with your roof both in looks and performance.
Sourcing Authentic Replacement Slate Tiles
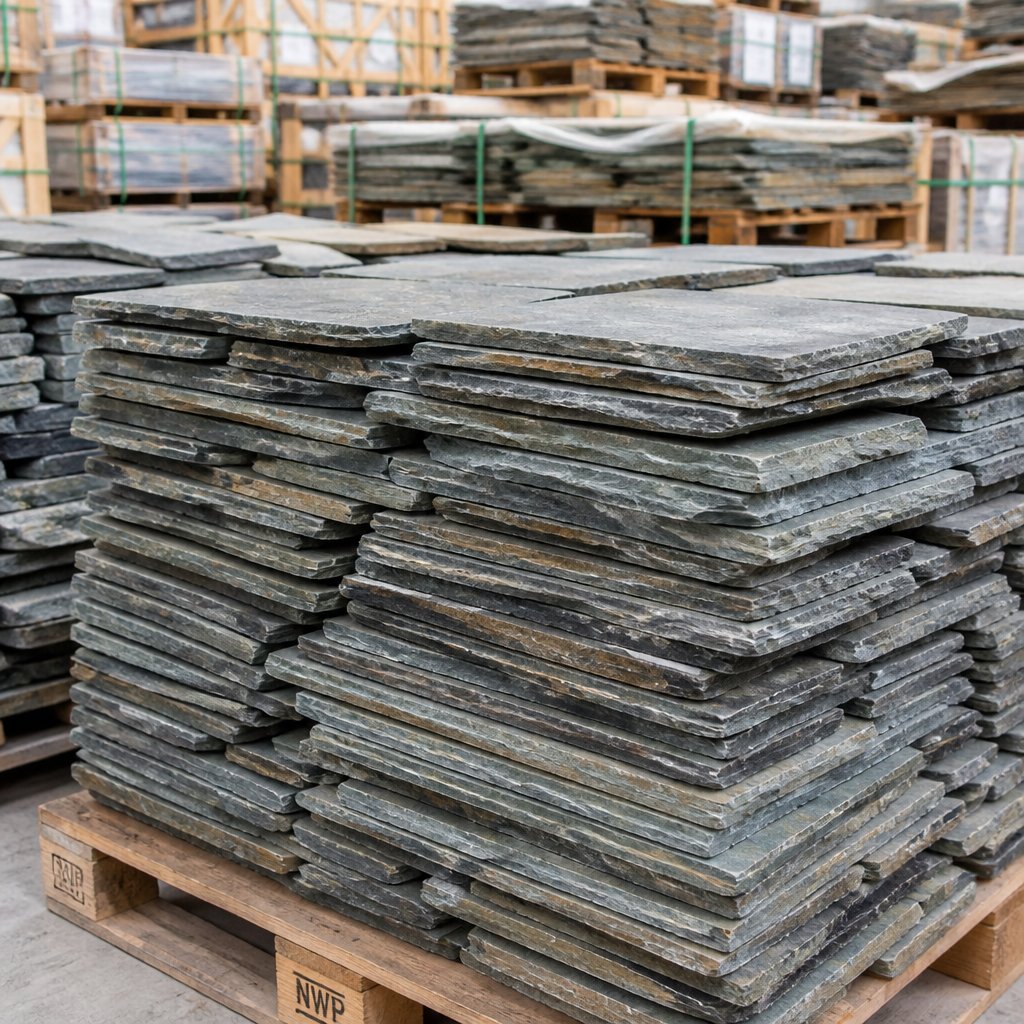
Matching historic slate starts with the right material. You need consistent color, size, and wear so repairs integrate with the existing roof. Focus on reclaimed slate with a clear origin, verified durability, and documented preparation. That removes guesswork and keeps the job moving.
Working with a Dedicated Reclaimed Supplier
Reclaimed Slate Roofing supplies authentic reclaimed slate sourced from historic structures across the United States. Every piece is inspected, cleaned, and sorted by size, thickness, and color before it ships. You get material that is ready to install, not mixed or unverified stock.
Orders are handled directly and typically ship within days, with delivery straight to your jobsite. That matters when timelines are tight. Clear batch consistency and reliable grading also make it easier to match existing roofs without excessive sorting on site.
What to Look For in Replacement Slate
- Provenance: Confirm where the slate came from. Historic structures and known quarries provide more predictable results.
- Surface and edges: Look for natural cleft texture, weathered edges, and existing nail holes that match your roof.
- Consistency: Check thickness, size, and color range across the batch.
- Condition: Avoid pieces with cracks, modern saw marks, or irregular grain that does not match traditional slate.
Ordering and Inspection Process
Request detailed photos and specifications before ordering. Review thickness ranges, color variation, and quantities. For larger jobs, confirm that material comes from a consistent batch.
When the shipment arrives:
- Inspect for damage and verify counts
- Compare pieces against your sample or existing roof
- Set aside any outliers before installation
Keep batch records and delivery details. This simplifies future repairs and supports documentation for clients or historic approvals.
Compliance and Jobsite Safety
Use materials sourced from permitted demolition or salvage. Maintain documentation for inspections or historic boards when required.
Follow lead-safe practices when handling older roofing systems. Use proper PPE, control dust, and handle flashing and fasteners with care. Safe handling protects your crew and keeps the project compliant.
Preparing Tiles for Installation
You’ll need clean, solid tiles that match shape and thickness, plus a few basics: wire brush, low-pressure washer, thinset or the right mortar, slate punches, and a flat work surface. Go through each tile and sort by color, size, and condition before you get started.
Cleaning and Restoration
Scrub off loose dirt and mortar with a stiff wire brush. If grime won't budge, try a low-pressure washer (500–800 psi) and hold the wand about a foot away—old slate can delaminate if you blast it too close.
Let tiles dry flat on a raised surface so air hits both sides. Replace any tiles that flake, split at the head, or lose more than 20% of their thickness. You can patch small chips and pitting with a matching pigment epoxy or a thinset patch if you want to save a piece.
Use rust remover on corroded nail holes, then re-drill or punch them to the right size. Mark matching tiles so they return to their original spot on the roof—keeps the color gradation looking natural. If you bought reclaimed tiles, jot down batch numbers or where they came from for future reference.
Adapting Replacement Tiles to Fit
Before you cut anything, measure the roof's exposure and the slate coursing. Trim tiles with a diamond wet saw or a slate cutter; for thin ones, scoring and snapping works fine. Wear eye and hand protection—slate splinters are no joke.
Match thickness and headlap to what's already on the roof. If a tile needs a new nail hole, punch a tapered hole just larger than the nail shank—drilling big holes risks cracks.
When you need to shorten or narrow a tile, try to keep the natural butt edge. For tricky shapes or trim, cut a bit oversize and then finish with a rasp or file. Hold back a few spares from the same batch for those inevitable last-minute swaps.
Reclaimed Slate Roofing supplies pre-cleaned, checked tiles, which saves a lot of prep time and keeps color and thickness more consistent.
Matching Mortar and Installation Techniques
Pick mortar that matches the original in color, strength, and breathability. Stick with installation methods that respect historic roof lines, nail spacing, and slate sizes, but don't forget about modern water control and safety.
Mortar Composition for Historic Projects
Test small batches of mortar on scrap slate to get the color right. Go with a lime-based mortar (3:1 sand to lime) for flexibility and breathability. High Portland-cement mixes trap moisture and can wreck old slate and masonry, so steer clear.
Match sand to the original for color and texture. Use natural pigments sparingly—too much and you’ll get weird results. Aim for a compressive strength close to the old mortar—usually on the lower side for historic roofs—so the slate and joints move together and don’t crack.
Only use hydraulic lime if the original mortar has some cement in it. Keep water content moderate so joints cure slowly. Always mix small batches on site and write down your ratios for next time.
Installation Methods for Slate Tile Restoration
Catalog the slate sizes, nail hole patterns, and headlap before you start. Reclaimed slate usually needs sorting by thickness and length—group them so each course is even. Use copper or stainless nails matched to the slate's thickness to keep rust at bay and hold everything tight.
Set slates with a slight forward pitch and the right headlap to match the original drip lines. Use lead or copper flashing and go with a breathable, non-bituminous underlayment so moisture doesn’t get trapped. When replacing several courses, follow the original coursing and use matching reclaimed pieces where they'll show.
For complicated spots like dormers or valleys, pre-fit pieces on the ground. Keep notes on fastener spots, mortar mixes, and tile sources. If you need reclaimed material fast, Reclaimed Slate Roofing can help with vetted stock and quick delivery.
Preserving and Maintaining Matched Slate Tiles
Keep matched slate clean, secure, and well-documented so repairs don’t stand out. Track your tile batches, check the roof regularly, and use the right fasteners and underlayment to protect matched areas for the long haul.
Ongoing Care Recommendations
Inspect your roof twice a year and after storms. Watch for slipped, cracked, or delaminated slates—note their location and batch number if you have it.
Remove moss and debris with a soft brush or low-pressure spray. Skip power washers and metal scrapers—they can chip edges or strip the patina.
Swap out damaged slate for tiles that match thickness, color, and weathering. Use copper or stainless nails sized for the slate gauge, and set them with the right headlap to block water.
Keep flashing sound around chimneys, valleys, and dormers. Reseal or replace metal flashing before leaks pop up.
Document repairs with photos, dates, and tile sources. Good records make future matches easier and help with historic approvals.
Preventing Future Mismatches
Buy extra tiles from your original batch and store them dry and labeled. Even a small stash of reclaimed slate can save you from mismatched repairs later.
If you need more tiles, try to match the quarry, region, or reclaimed batch. If that's not possible, match thickness and edge profile first—color comes after.
Use the same installation methods for all repairs: same nails, headlap, starter course. It keeps new work from sticking out.
Train your crew to prioritize slate thickness, gauge, and weathering over exact color. That way, repairs look more seamless and the roof keeps its matched appearance longer.
Common Challenges in Historic Slate Tile Matching
Trying to match old slate tiles? You'll run into uneven sizes and faded colors. Careful measuring, sorting, and checking sources helps you find tiles that actually fit and look right.
Dealing with Irregular Tile Sizes
Historic slate tiles rarely match modern sizes. Measure several existing tiles for length, width, and thickness. Note the most common sizes and any oddballs so you know what to keep, trim, or toss.
Plan for custom flashing and underlayment if thickness varies. Use shims or tapered battens to keep the roof plane even. When reclaiming tiles, check each for cracks and consistent headlap so nails and overlaps line up.
Order extra reclaimed pieces to cover rejects and future fixes. If you’re working with a supplier like Reclaimed Slate Roofing, ask for graded lots and size charts to save time sorting on site.
Color Variation Over Time
Slate changes color as it ages—sun, pollution, and minerals all play a part. Instead of chasing a perfect match, group tiles by similar tones.
Take roof samples and compare them with reclaimed stock in natural light. Photograph tiles on cloudy and sunny days to see how the color shifts. For visible edges, pick tiles that match the roof’s main tone.
When perfect matches aren’t possible, blend darker and lighter tiles in a pattern that looks intentional. Only seal small areas if you’re sure the sealant won’t mess with the slate’s look.
Professional Support and Expert Guidance
Sometimes, you just need help. Whether the roof is old, tricky, or has features you’re not sure about, find experienced restorers, reliable reclaimed tile suppliers, or sign up for a short training program to keep your repairs accurate.
When to Consult a Specialist
Reach out to a slate restoration specialist if you spot lots of cracked or delaminated slates, recurring leaks at valleys or chimneys, or unique features like cupolas and patterns. These pros can match color, thickness, and gauge so new tiles blend with the old.
Ask for a field inspection that checks structural loads. A good roofer will measure slate size, nail type, and exposure, and suggest rafter reinforcement if needed. They can also help source reclaimed tiles that match the roof’s patina.
If you’re dealing with permits or preservation rules, a specialist will document the work, provide replacement samples, and help you steer clear of mismatches that could cause headaches later.
Training Programs for Historic Slate Restoration
Look for classes that mix classroom learning with hands-on labs. The best programs teach slate grading, splitting, nail patterns, flashing, and safe removal of old tiles. Actually pulling up and resetting slates is a must.
Check out courses run by preservation boards, trade schools, or seasoned roofers. Make sure they cover matching methods—measuring headlap, identifying quarries, and choosing between reclaimed and new slate. Ask if they offer a certificate or continuing-ed credits.
If you’re working with reclaimed materials, pick training that covers how to source and vet reclaimed pieces. Reclaimed Slate Roofing can supply materials and point you to contractors who know historic matching inside out.
Frequently Asked Questions
Here you'll find practical tips for matching historic slate tiles, cost ranges, natural slate choices, advice for sourcing reclaimed slate floor tiles, color selection, and roof-matching methods. The answers are meant to be genuinely useful for real restoration work.
How can I find matching slate tiles for a historic renovation project?
Start by measuring your existing slate—size, thickness, color, and any markings. Take clear photos in daylight and note the installation pattern (stagger, bond, coursing, whatever you see).
Look for reclaimed suppliers who inspect and prep their slate. Reclaimed Slate Roofing does this, which makes finding close matches a lot easier.
If you can’t get enough reclaimed stock, plan repairs in phases and blend pieces as you go. Always keep a few extras for future patches—you’ll need them.
What are the typical costs involved in matching historic slate tiles?
Reclaimed slate usually costs more than new standard slate, but less than custom-made pieces. Prices depend on rarity, color, size, and condition.
Factor in the cost of inspection, cleaning, shipping, and any trimming. Skilled roofers charge more for historic work, so labor isn’t cheap.
Ask about bulk or direct pricing to save a bit. Reclaimed Slate Roofing sometimes offers wholesale pricing and quick shipping, which can help cut costs.
What options are available for natural slate tiles in historic buildings?
You’ve got a few choices: reclaimed original slate, new quarried natural slate, or sometimes modern matches if reclaimed is scarce. Reclaimed has the most authentic look and patina.
New slate is more uniform and comes with warranties, but can look a little too fresh. Try small test patches to see how it looks before you commit.
Pay attention to tile shapes, edge profiles (square, rectangular, fish-scale), and fastening methods to keep things authentic.
Can you suggest tips for sourcing reclaimed slate floor tiles?
Start with local salvage yards, auctions, or specialized reclaimed roofing suppliers. Go for suppliers who clean and check each piece.
Ask for samples or photos with a ruler for scale. Double-check quantities and delivery times so you don’t run short halfway through.
Inspect tiles when they arrive for thickness, warping, and surface quality. Order a bit extra for waste and future fixes.
What should I consider when selecting the right colour for replacement slate tiles?
Compare tiles outside, in the same light where they’ll be installed. Sun and shade both change how slate looks.
Match undertones (blue, green, purple, gray) rather than chasing the exact shade—undertones blend better over time.
Keep a few spare tiles that match the installed look. Makes future repairs less of a headache.
How do you match old slate roof tiles for a seamless appearance?
Start by sorting reclaimed tiles—color, size, thickness—before you even think about putting them up. It's honestly worth laying out a rough pattern on the ground first to see how everything blends. Sometimes, what looks like a match in your hand turns out a bit off once you step back.
When you install, try to overlap and stagger the tiles, sticking with the original coursing as much as possible. Nail placement and edge cuts matter too; if you keep them consistent, transitions are a lot less obvious.
If you need to replace tiles, do it in small patches, not big sections. That way, the new pieces mix in better with the old ones. And hey, if you find tiles that match really well, keep a few extras around—you'll probably thank yourself later when repairs pop up.